Valentine's Day🌹


✨ Build your dream setup!
×


Moody Pictures with Dark Aesthetic: 8 Workable Tips and Lightroom Tutorial

Art photography is a combination of features like colour, lighting, poses, and themes. The factor allows you to achieve desired preferences like moody pictures with dark aesthetics. The photography type helps communicate a subject's personality or relay specific information to your audience.
If you're intrigued about how to execute moody pictures, the article below reviews tips to consider, and a step-by-tutorial guide. Continue reading to discover more information.
What to Consider to Get Moody Dark Aesthetic Pictures
So, what should you do or factor in to achieve the best moody and aesthetic results? Firstly, know your way around the camera, especially the settings.
Here are other factors to consider:
1. Use Proper Camera Settings and Modes
You should be efficient in composing the Camera's aperture, ISO, and shutter speed.
Here's what to do to enrich your theme:
- Aim at increasing the ISO, which will make the image brighter,
- Decrease the aperture value to achieve darkness.
- Use a lower shutter speed to get a dark aesthetic.
Additionally, use a tripod to minimize shake and blur.
2. Use Natural Lighting
It's important to have less light in dark aesthetic images. Natural Lighting can make it easy to manipulate your camera settings. The sources include sunlight via windows or roofs, and moonlight.
Some artificial sources like streetlights provide excellent photos. It comes in handy if looking for darker aesthetic portraits.
3. Create Contrast on Your Subject
Playing with your light can create various moods. Adjusting your contrast helps highlight the dark parts of your scene, and draw attention to the shadows.

Photo by Matt Antonioli on Unsplash
4. Combining High and Low-Key Contrast
Combining High and Low-Key lighting helps in creating a dramatic look via the multiple tones and shades. High-key lighting is bright and evenly distributed, usually from multiple sources. Meanwhile, low-key lighting is a single darker source and a more directional type.
You can also create contrast by using or combining different colors and tones. For example, you can use warm tones like yellow, orange, and red.
5. Use Underexposed Camera Settings

Photo by Shyam on Unsplash
An easy trick is having your exposure settings like to get the moody results. Moreover, using minimal lighting can also come in handy in the process.
Underexposing a photo is also another way to achieve contrast and shadows that are darker than the actual subject. This helps the subject stand out from the background and creates a more dramatic effect.
6. Use a Colder White Balance
Manipulating your white balance is crucial. It helps judge the photo's atmosphere, and can easily help switch between warmer and colder moods.
For instance, reduce warmer tones such as yellow and orange, and increase the amount of blue and green tones. You'll get a much darker theme and be able to highlight the shadows.
7. Learn to Desaturate the Images
Desaturation involves the reduction of color Saturday and can be achieved through digital and analog forms.

- Digital photography: Includes use of editing software such as Photoshop and Lightroom. They allow you to reduce the saturation of individual colors or change the overall saturation of an entire image.
- Analog photo editing: You achieve this by combining filters. They help block certain light colors, to get a desaturated image. Another technique is to use lower ISO, to produce more muted tones.
8. Aim for Silhouette Results
Silhouettes are the first thing to come to mind when looking for moody darker pictures. You'll achieve them by capturing a subject against a dark background. However, you might need to find the best settings or angles to achieve the most aesthetic silhouette.
Tips for the best results: A bright background won't have an ideal dark theme (it'll be too faint). Additionally, ensure to get as close as possible to the subject.
9. Utilise a Larger Aperture
A large aperture lets more light into the camera, thus enabling softer-looking photo results. Additionally, it offers a greater depth of field, which makes the background out of focus. Therefore your subject will be in focus, with the entire picture achieving an attractive and dreamy effect.
How to Create a Dark Aesthetic Photo in Lightroom
Editing raw photos can greatly assist in creating the best final results. However, remember to get quality photos when shooting. This will make your time easy, and help focus on enriching dark aesthetic features.
Lightroom is one of the apps you can use. We've got you covered with a step-by-step tutorial on how to create a dark aesthetic theme. Read on for more.
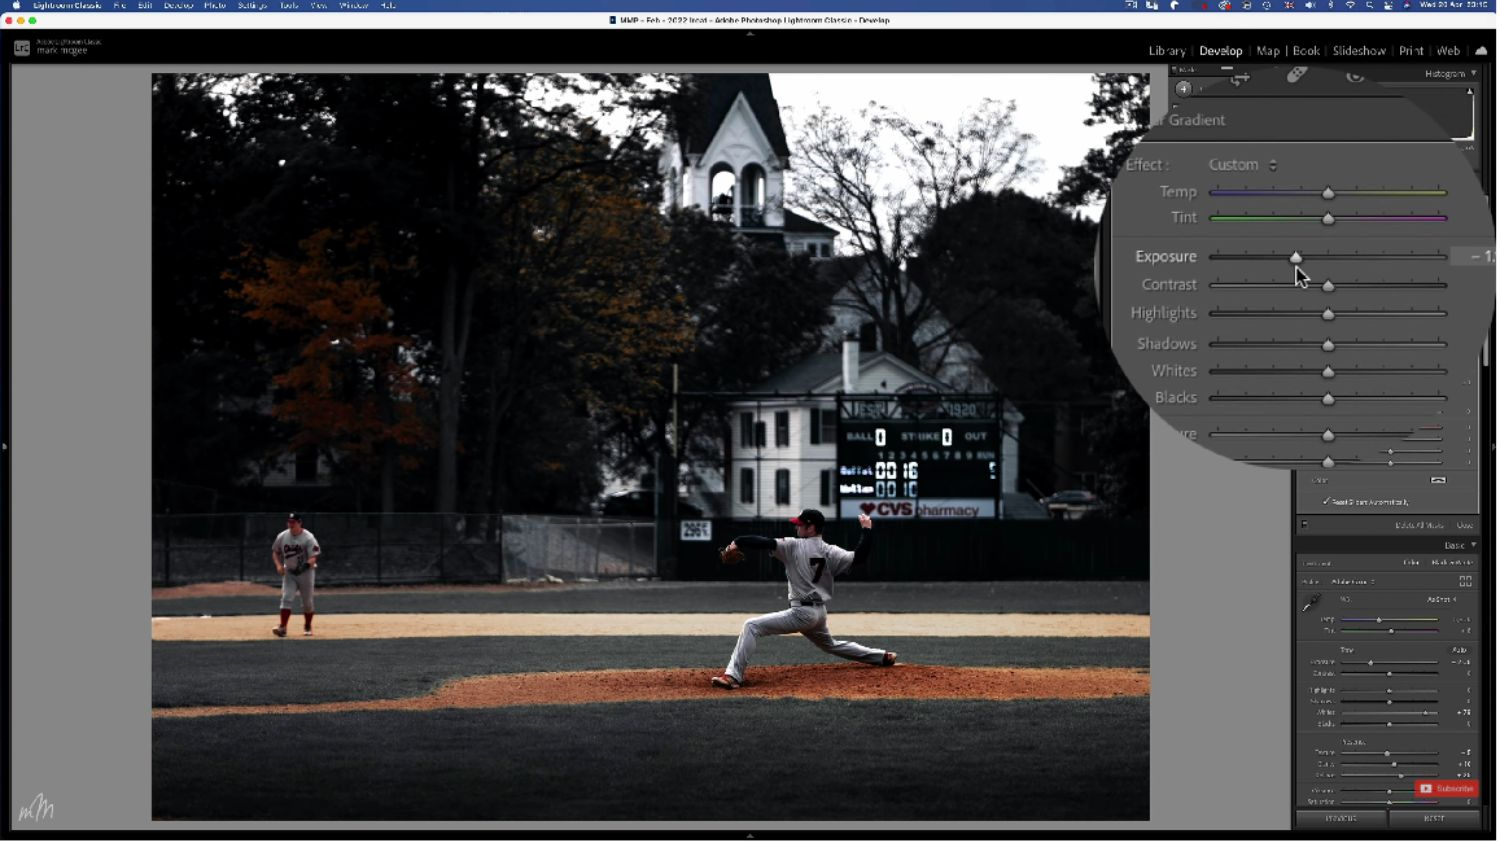
Step 1: Lower Exposure and Saturation

As mentioned a dark mode should dominate your photo, thus the need to minimize any harsh brightness. A two-stop reduction for respective brightness adjusters will be perfect.
The next step will be adjusting the saturation sliders. Lower the colors to the desired levels, according to your theme.
Step 2: Turning on Highlight Clipping and Dehaze

Followed by decreasing dehaze and clarity, then increasing the exposure. The actions indicate how far you should move the white sliders. Typically, 80 should be ideal.
Dehaze up to about 25, then add a touch of clarity and some negative texture with the basic sliders.
Step 3: Introducing Colors In a Controlled Way

Here's how to make the dark theme superior:
- Reduce the reds to a negative value like -20. Other shades like Orange should restore the colors in the subject's skin tone.
- You'll want to keep yellow and green to a minimum.
- Increasing the color blue intensity can also help.
- Reduce the saturation of the green color of the background if editing an outdoor photo.
Additional Colour Manipulation Tips:
- When editing an outdoor photo, color-reducing reds and oranges can reduce the opacity of the ground.
- If on the beach, the sand will appear darker and moodier.
- Also, increasing aqua, blues, and purple will bring up the subject's details.
- Increase the orange slider slightly to balance the ground's outlook.
Step 4: Color Grading
If you're a professional photographer, color grading is crucial in balancing your lighting. To achieve the dark and moody theme, you might need to creatively compromise various colours. Examples of the actions in creating a darker mood include the following:

Adding some blues in the shadows and some warmer tones in the highlights.

Reduce exposure and add a Linear vignette gradient to the foreground.
Including colors that highlight dark objects. For instance, add some hazel and dreamy quality to the trees by decreasing dehaze and clarity, then increasing exposure.

Step 5: Fading The Blacks

Tutorial Image Credit: youtube.com
This can be accomplished by adding a few control points to the tone curve and bringing up the image's darkest areas. The control point aids in the maintenance and straightening of the control curve line.
Conclusion
With the above information, you can confidently execute moody dark aesthetic photoshoots or editing. The write-up mentions crucial factors to consider and tips for getting great edits. Do research on your genre, setting, and client requirements to have an easy time with processes. Luckily, you can incorporate creativity at any point in the Photoshop or Lightroom editing process.