


 Christmas


✨ Build your dream setup!
×


Step-by-Step Tutorials for 4 Common Photoshop Overlays: Bokeh | Snow | Sky | Leaf

Photoshop overlays can be a great way to add an extra flair to your photos. This article will discuss the four common types: bokeh, snow, sky, and leaf. We will provide step-by-step tutorials on how to add overlay in photoshop so you can play overlay and add them to your photos.
What is Photoshop Overlay?
An overlay is a photography term that refers to superimposing one Image on top of another. You can do this for aesthetic or practical purposes, which can be accomplished using Photoshop or other image-editing software. When two images are overlaid, the result is often a more complex and interesting composition than either of the original pictures.
How to Add Bokeh Photoshop Overlay?
Step 1: Create a New Layer
To start, click the New Layer icon to add a new layer. Use the D key on your keyboard to set the foreground and background colors to their default settings of black and white.

Press Alt Backspace on Windows or Option Delete to fill the layer with the foreground color, which is black (macOS).
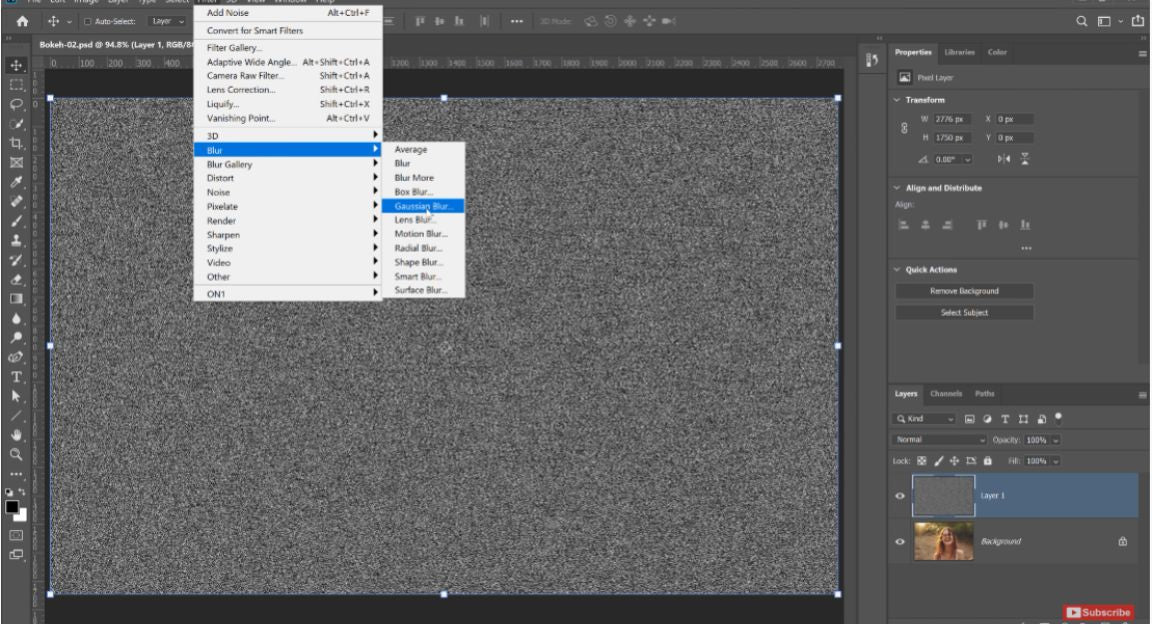
Step 2: Add Noise
After adding a black fill to your layer, select Filter > Noise > Add Noise. If your current layer has the same type of white noise that you hear on television, you are on the right track. Adjust the value till the noise fill resembles the Image below. The Amount value depends on the dimensions of your Image.

After that, click OK to close the window and start using the Filter. Return to the Filter> Blur > Gaussian Blur menu. Tweak the blur value till it looks like this:
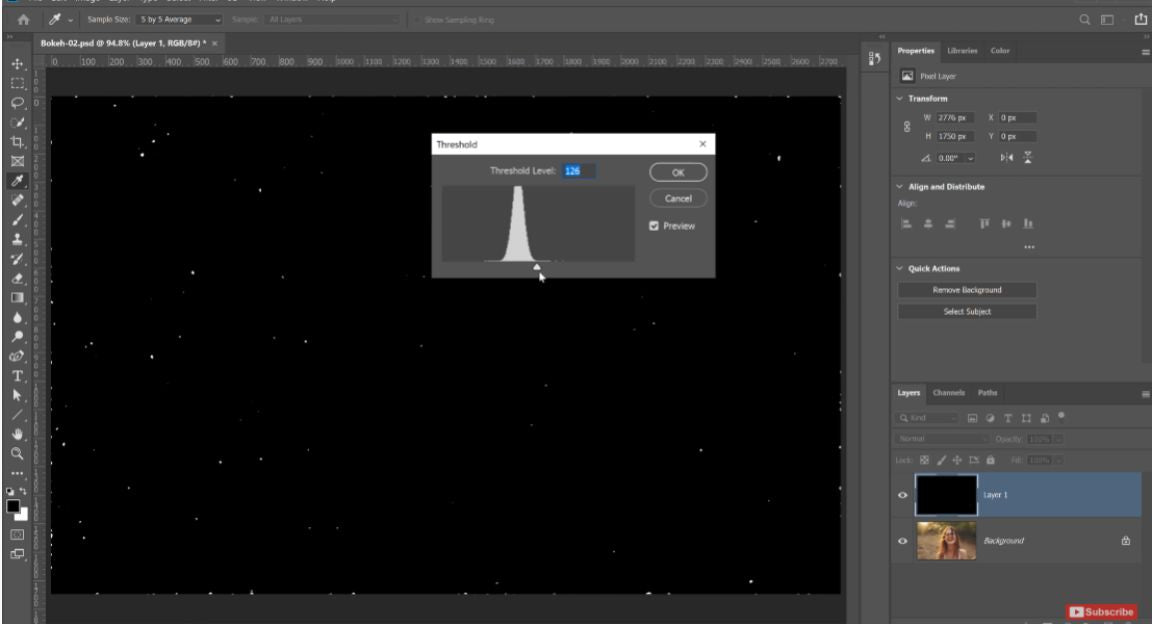
Press OK once again to close the window and navigate to Image> Adjustment Threshold. The Threshold setting turns pixels black or white. You can get more or fewer particles by dragging the handle to the left and right. You need a couple of evenly dispersed specks for this instruction; therefore, you'll set it to Threshold Level 126. However, your Image may necessitate a different value. When you're finished, click OK.
Step 3: Create the Bokeh Overlay
Then select Filter> Blur Gallery > Field Blur.

Light Bokeh can be found under the Effects tab in your workspace. Adjust the Light Bokeh slider to increase the brightness of the particles.

Adjust the Blur slider in the Blur Tools to expand the specks and imitate the bokeh effect. Adjusting the Light Range slider on the Effects menu will reveal more bokeh numbers, so adjust accordingly. When you're happy with Bokeh's amount, size, and brightness, click OK to save your adjustments and close the window.

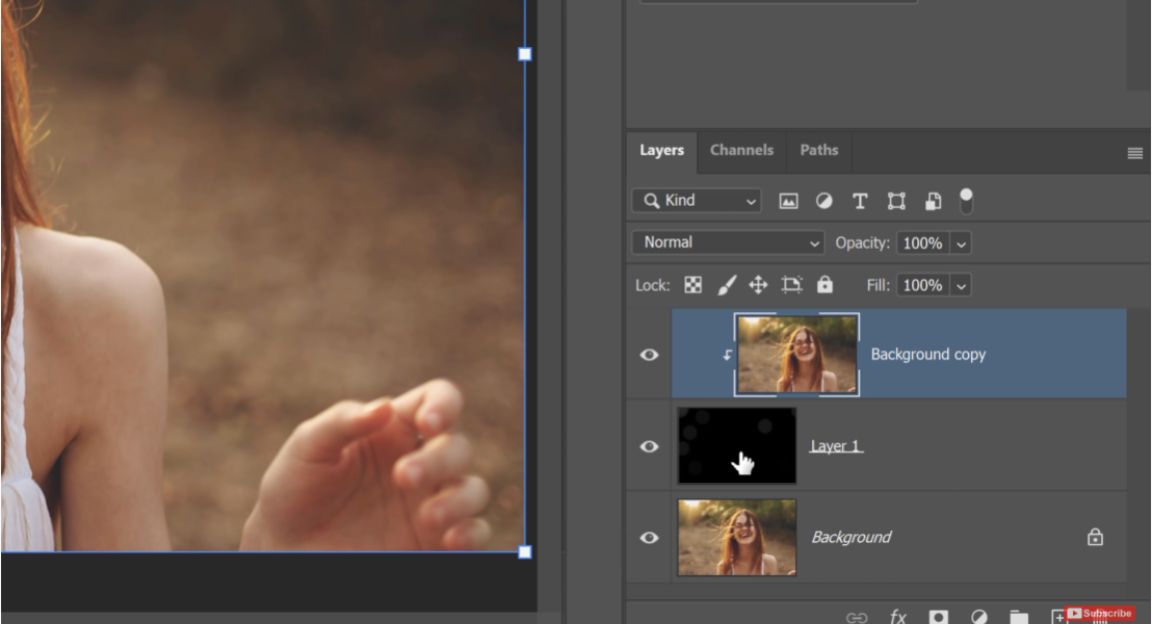
Step 4: Add Color to the Bokeh Overlay
Return to the Layers panel, pick the Background layer, and duplicate it by pressing Ctrl J or Command J. Then drag and drop the Background Copy layer above the Bokeh layer to use it for the bokeh colors. Rename this layer Color to avoid confusion. Then, hold down Ctrl G or Command G to clip the Background Copy so that it only affects the layer underneath.
Return to the Filter> Blur > Gaussian Blur menu. Adjust the Radius slider until you can no longer perceive the subject's silhouette, and only the smooth color gradations remain. Again, press OK.

Then, adjust the layer's Blending Mode to Color so that the Bokeh layer will absorb the colors of the Background Copy.

To remove the black pixels and keep only the bright pixels, change the Blending Mode of the Bokeh layer to Screen. You may also modify the hue, saturation, and luminance of the layers' colors by going to Image> Adjustments > Hue/Saturation.

Step 5: Control the Intensity of the Bokeh Overlay
If you are still unhappy with the outcome, you can always alter the bokeh overlays in Photoshop until they are to your liking. To do so, navigate to Image > Adjustment > Levels.
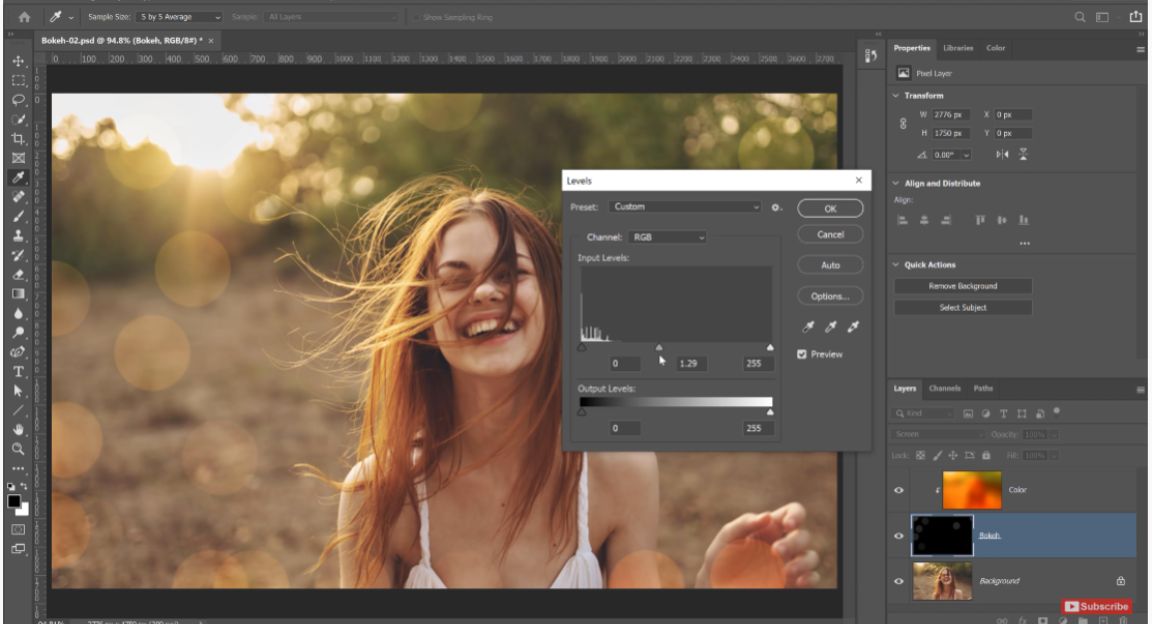
By pulling the handles to either side, you may change the intensity of the Bokeh. Hold the Shift key while dragging the corner handles to extend or contract the layer's coverage over the Image if you want to change or move the placement of the Bokeh around the Image. This gives you complete control over the bokeh effect, ensuring that your subject is not overwhelmed or obscured by it.

How to Add Snow Photoshop Overlay?
Step 1: Place Your Overlay
To start, you can do two things: place your overlay on top by going to file> place embedded, or you can open the one you like, which is easier to search.

Once you have found the overlay you want, click on it and drag it to the photo. If the overlay is smaller, resize it to fit the photo.

Step 2: Change the Blending Mode
From the drop-down, you should change it from normal to Screen. Changing, it removes all the black background and leaves the Snow.

Step 3: Remove the Big Flakes Around the Subject's Face

Since the flakes are distracting, remove them. Create a layer mask and select the black brush. Then brush over the subject's face at 100 opacity. You will lower opacity to 10 to slightly brush the subjects' faces. This ensures there are not alot of distracting flakes around the subject's face.
Step 4: Add a Second Layer of Snow
Since it will not be very natural-looking, the subject doesnt have some overlap on the hood of her coat or jacket. Then the second layer of Snow needs to be added. Resize the overlay until it fits by pressing ctr T if you use a mac computer.

Set it to screen, too, and now you will have two overlays you can work between the two layers. Just erase anything you dont want. In the picture we have, we dont want to block the subject's face. So brush what you dont want, then use a lower opacity as before.
Step 5: Add a Third Layer of Snow

If you want a bigger snowflake to fall, and don't find an overlay that has the size of the snowflakes you need. What you can do is place another overlay on them. Grab the background layer and place it on the Image you are adding a third large. Since you want your snowflakes bigger, resize the overlay to enlargen them. Create a layer mask, pull up your black brush, and brush what you dont like on her face off.
How to Add Sky Photoshop Overlay
Step 1: Placing Your Sky
The first thing you do is to place your sky. Go to file> place embedded, choose the sky you like, and click place.

This will pop the sky on your photo, and you may notice it has a bounding box so that you can adjust this. You will raise the bottom of the sky near the horizon and then lift the top a little. This ensures the sky isnt too smushed, then hit the checkmark when you're done.

In this picture, the mountains behind or subjects are all in focus. So we are going to leave the sky in focus as well. Suppose your background is blurred; it's best to blur your sky to maintain believability. Go to Filter> blur, choose the blur you want, and apply it to the sky.
Step 2: Change from Normal to Multiply

In your layers panel, select the drop-side menu and change from normal to multiply. This will allow you to see your subject through and helps blend the colors as well. Multiply is a great blend mode for adding to skies.
Step 3: Add a layer Mask
Add a layer mask by hitting the little box at the bottom, the one with a rectangle and the circle inside this, and a layer mask will pop up on your picture.

Step 4: Brush your sky
You can select the gradient tool by clicking G on your keyboard, or you can select the tool from your left menu icon. Make sure your white Color is on top. You can start halfway up to the sky and pull down to about where your subjects are. You will notice this kind of blends the sky in. You can do this several times to see different effects.

Grab a soft brush and ensure that your Color is set to white; opacity should be low at about 10%. You can always paint a little more sky at the bottom if you want it to be just a little bit darker; then that's it; your sky is added.
Bonus: For Stormy Sky
Step1: Place the Sky
Place your sky overlay on top of your Image. To do this, go to file>place embedded; this time, we have a stormy sky. Once the overlay is placed, size your overlay to fit the skyline where you will place it. Ensure the sizing overlaps onto the Image. Then click on the check mark to confirm this. Put it into multiple modes; since white space is along the top, you can nudge that upwards to hide the white space and edit free transform to ensure you stretch it long enough.

This is great for wanting to try out different skies and seeing which one looks best for your photo instead of having to do the layer mask all over again. You can alter or option-click the layer mask that you already adjusted on the sky and drag it up to the new layer. It duplicates it and puts it on the new layer, so you dont have to try it twice; you can use that same layer mask.

Step 2: Zoom in Your Subject
You might zoom in on the subject and ensure that you paint with a black brush over your subjects to double check that there's no sky left on them.

How to Add Leaf Photoshop Overlay?
Step 1: Apply Leaf Overlay

Search for your folder containing your leaf overlays, and select the overlay you want. Click place, drag the overlay at the corner, resize it, and click the check mark.

Use a soft black paintbrush and erase off on your subject what you dont like.

Step 2: Move Your Leaves Around
If you like different looks but like the same overlay example using it for multiple Images, you can go to Filter> liquify. Here you can move around your leaves. You can also make them look like it's windier. You may go to the twirl tool, the fourth one down, twirl clockwise, and you can completely twirl them around.

Step 3: Go to the Leaf Editor Actions
This makes your actual leaf overlay selected, not your mask. You can press play to edit them however you want; you can darken or change the leaf tones. When you change the leaf tones, it will take you to the saturation box. You can change the Color however you see fit in saturation and lightness, then press okay.

Step 4: Change Leave Color
You can change the leaf color, add more Color, and desaturate to change the leaf color by hitting okay. Then you can select different color leaves in your picture that are already there, or you can play around in your picture box.

Step 5: Clone Your Leaves
If you want more leaves, you can clone the existing ones. Hold the alt key on your keyboard, select the cloning tool, and make more. You can do this by going to apply a leaf overlay. You can add more Color or even warm your Image up more depth.

Step 6: Match Your Leaves With the Foliage
You can match your leaves with the foliage already in your Image with trees. Select your backgrounds, press play continues, and then choose a color you'd like it to match. Paint over the areas you'd like to change the Color. Change the blending mode to multiply.

Conclusion
Overlays are a great way to add interest and depth to your photos. We’ve shown you how to add overlays in Photoshop. Now it’s time for you to play overlay and experiment with these techniques and see what amazing creations you can come up with.
Image Credit:
Bokeh Overlay: youtube.com
Snow Overlay: youtube.com
Sky Overlay: youtube.com
Leaf Overlay: youtube.com


Weekly Picks 15%OFF
Save 15%


Save 15%


Save 15%


Save 40%