


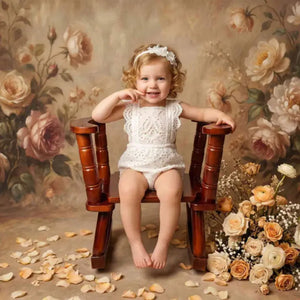


 Christmas


✨ Build your dream setup!
×


About Backdrop
35 DIY Photo Backdrop Ideas You Must Try to Unleash Your Creativity

Do you aim to DIY your perfect photo backdrop? You’re in the right place!
Maybe you’re a photographer, willing to spice things up in your next photoshoot…
Maybe you’re part of a fun group of friends and want something cool for your next party pictures…
Maybe you’re a mom aiming to create the best birthday setting for your child…
It doesn’t matter who, what, or where. What matters is that you are filled with creativity! This article will give you 35 DIY photo backdrop ideas for all kinds of photoshoots-yes, yours included!
So worry no more and get your Art Attack ready! Let’s get into it!
DIY Photo Backdrop Ideas
Let’s start professionally. Here are some DIY backdrop ideas, that you can mostly use in professional studio photography. These are great for enhancing the visual composition of photos.
So if this sounds like what you require, wait no more. Dive into it!
1. Geometric DIY Photo Backdrop
Geometric DIY photo backdrops can be such a good background scenery! They work well, especially to enhance portraits and add a touch of style and personality. You can easily create some with cardboard.
Be creative with the shapes—triangles, circles, rhombuses, and hexagons all work! Color them with acrylics according to the color palette your model(s) are going to wear! Then, attach them to a plain-colored wall, cloth, or paper.

2. 3D Triangles for the Trippy Backdrops
If you love the geometric shape idea but want something that feels even more three-dimensional, here’s your DIY tip! Make some 3d triangles that you can attach to a plain surface.

You can easily create them by attaching 4 plain triangles into one paper pyramid. Place them, and attach them, all together on your favorite plain background. Now, see your pictures drastically coming to life with this easy-to-make optical effect.
Otherwise, just grab a Kate printed 3D backdrop and you’re ready to shoot-no setup stress, just instant photo magic.

3. Tissue Paper or Flower Photo Backdrop
You don’t need expensive and hard-to-find materials to create a beautiful backdrop outcome! You can simply use tissue paper! Yes, you’ve read that right!
For a very simple outcome, get a bunch of tissue paper and paint it with your favorite colors. Then, wrinkle them and attach them to a piece of cloth or cardboard. Make sure you choose harmonious colors that go well together! You’ll see how placed together and colored, the tissue paper will resemble flowers.

Cutting dozens of paper blooms is cute…until the petals curl, your scissors dull, and half the flowers sag before you finish. Skip the cutting binge-go instant garden with a printed tissue floral backdrop that’s always camera‑ready.

🌸 Create a full floral look without the DIY mess ➜
4. Magic Fairy Lights Backdrop
If what you're looking for is less of the colorful, geometric result and more of the magical, aesthetic kind, hear me out! Fairy lights are life saviors! You can rely on fairy lights to add a cozy mystical vibe to anything. Yes, your photography backdrop is included!
So for this result, hang fairy lights all over a plain, clear setting and let them do the rest! You can add more personality according to the shooting.

Gauze drape + string lights = dreamy…right up until you’re hiding cords, testing outlets, and fighting uneven hot spots.
One printed glow backdrop = plug‑free sparkle in seconds.
Easy Win: Kate String Light Glow Backdrop

5. Coffee Filter Anyone?
Were you really throwing away your coffee filters after use? No, you don’t have to! You can easily reuse them and create a sustainable DIY backdrop with them.
Color them with your favorite color scheme (watercolors will work too!) Then, take a needle and thread and make sure the thread is long enough to cover all the background space needed. Fill several threads with your colored coffee filters! Finally, hang them close to one another. Voilà!

6. Ribbon Drape and Flowers, Please
Are you the romantic, and poetic kind? If you aim to decorate a large surface with something cute and charming check this out! Go buy your favorite colored ribbon drape out there! Then find some flowers that match their colors (or vice versa).
Spend a creative afternoon attaching your fresh colorful flowers to the ribbon drape and then hang them on your chosen surface! Now your homemade picturesque backdrop is ready for shootings.
Threading, trimming, fluffing every ribbon so it hangs “just so” is a patience test. Printed ribbon florals drop in flat, straight, and photo‑ready-no ladder gymnastics.

📸 Create a romantic setup that’s photo-ready from the start ➜
7. Paper Floral Backdrop
How can we not mention flowers when talking about DIY backdrop ideas? Of course, you can buy flowers at the market. But if you want something that lasts longer (and you want to have fun during a creative afternoon) you can always create some paper flowers or choose a floral photo backdrop! For this outcome use some crepe paper (your favorite colored ones).
Cut your favorite-looking petals and attach them to a round card paper. After you’ve created a good amount, proceed with putting them together on a large surface! You can either fill the backdrop surface or just attach some as a frame.
Build, glue, tape, hope it stays-then a bump and petals pop off. Printed dimensional florals hold their look all day without hot‑glue heartbreak.

✨ Let layered florals bring instant depth and fun ➜
8. DIY Paper Chain Backdrop
A less demanding outcome can be achieved by creating some DIY paper chains. You can easily do so by cutting some stripes out of colored-card paper or seamless background papers. Then, attach the ends to create a little circle. Once you have plenty of colorful card circles, you can proceed with attaching them together like chains.Make sure you create 25 chains of about 20 circles each so that the backdrop outcome can feel colorful and cool.

9. Woodsy Photo Backdrop
DIY backdrops don’t only include art attacks filled with paper, paint, and scissors. You can create your own backdrop even with the use of wood! Yes, a wood photography backdrop can be ideal to give that country, aesthetic, warm look to any picture!Whether you want to give it a go with carpentry, or you want to have a nice wood platform made, it’s up to you! Make sure you give it good lighting once it’s done.

🌿 Bring warm, rustic character into every frame ➜
10. Fabric Garland Aesthetic Backdrop
Another great way to be creative while personalizing your backdrop to your own needs and taste is using fabric garlands! This way you can choose your favorite-looking fabric and style your setting exactly how you wish it to be!
Find different bits and pieces, cut them to your preferred size then hang them together on a large surface. Here’s your customized, aesthetic backdrop. Rip, cut, knot…repeat. Fabric‑strip walls look great but eat time (and fabric) fast. Grab a layered‑strips print and spend those hours shooting, not snipping.

🎀 Start with a backdrop that delivers layers, softness, and ease ➜
11. DIY Citrus Backdrop
Now, wouldn’t you want to give a warm, yellow, orange-colored touch to your photos? You can easily do so by playing with citrus! And guess what? Your photoshoots will smell good too! For this perfumed outcome buy some oranges, lemons and grapefruits.Cut them into slices and let them dry for one day. Once dried, tie them together with a clear-colored string. Add them to any plain - yellow, beige, brown - surface. A bonus tip is to add some atmospheric fairy lights to them too!

Image from Pexels
12. Vintage Curtain Backdrop
Last but not least, if you're looking for an affordable photo backdrop that's simple and not too fancy, here’s a tip for you. Just grab a curtain that fits your photo needs. The vintage colors and natural textures will add some elegance and femininity to your pictures in no time. And a printed curtain photo background is what you only need.

✨ Add soft elegance with timeless curtain textures ➜
DIY Photo Booth Backdrop
If you’re less of the professional and more of the interactive kind, don’t worry! We have something for you too! Here are some DIY photo booth backdrops for the fun and interactive photoshoot. This is perfect if you’re planning a creative party with friends, an original wedding, or any other festive event.Get together with your favorite people and tailor the perfect backdrop for your special upcoming event! We’ve got you covered.
13. Scalloped Paper DIY Backdrop
Simply buy some colored paper (alternatively paint white paper with acrylics or watercolors). Then cut round ends, and place them all together on a cardboard platform. Add any personalized decoration, or keep it simple!

Image from Shutterstock
14. Cut-out Colorful Tissue Paper Backdrop
As mentioned before, tissue paper can be a great, budget-friendly, ally when talking backdrops DIYs. But for photo booths backdrops you can consider tailoring some colorful tissue paper according to your themed event! For example, place it in such a way that it resembles a symbol, a sentence, or a name. Everyone at your photo booth will love shooting in front, or with it!

Image from Shutterstock
15. Streamers' Photo Backdrop
This one’s old but gold! I’m talking about streamers. Yes, the good old streamers that give that extra light, and life, to any event! It’s that aesthetic accessory that everyone would want to pose in front of! So, of course, streamers cannot miss as a photo booth backdrop! Make sure you select some glitter-looking, color-fitting ones that will bring that extra life to your unique event.Taping up miles of streamers takes forever, and humidity loves to pull them back down mid‑party. Printed stripes with balloon background stay put and save your wrists.

💖 Add instant color, light, and energy to your photos ➜
16. Creased Tin Foil
If streamers seem outdated, don’t panic! Here’s the perfect plan B for you. Have you ever thought of creased tin foil? Yes, tin foil - such a simple, cheap, and accessible material. However, this effortless item will easily enhance your photo booth’s photoshoot! It will add life, light, personality, and an extra disco vibe!Simply glue as much as possible (and as much as you want) to a cardboard surface. Attach some on the floor too, for some extra disco vibe. Try it to believe it.
Metallic fringe dazzles and blinds your camera-specular glare is tough to tame without careful lighting tweaks. Matte‑printed metallic textures give you the shimmer without the hotspots.

💙 Capture bold party vibes with smoother, calmer lighting ➜
17. Popsicle Backdrop for Endless Summer Lovers
Now, let’s change the vibe! Not all photo booth backdrops aim to be eccentric and party-themed! Some aim to feel fun, light, and colorful. If this is the case, you might want to bring some endless summer vibes to your event! And what’s better than popsicles to achieve that result? Then get all fun and creative with some real popsicle sticks (yes, you’ve understood it right!
A good amount of popsicles needs to be eaten for this outcome).Then, be creative by drawing, cutting, and painting some popsicle shapes out of cardboard or card paper. Attach them on a string, then place them on a plain background. Prepare for some fun, summery, colorful shoots in front of it!
Bonus tip: you can save some to use a Kate Ice Cream Party Backdrop

🍦 Let color and sweetness set the mood instantly ➜
18. DIY Paper Fan Photo Backdrop
If you aim for something more aesthetic and elegant, check this out! Consider doing some cute and graceful paper fans. Make as much as you want and either place them all over a plain background or make less and glue them just as a frame. You can easily make some by accordion-folding some colored papers and gluing them at the extremes, in a round-looking shape.
Laying out, taping, and leveling dozens of fans takes measuring tape + patience-and they still shift. A printed paper fan backdrop works better with longlasting use and easy setup.

🌸 Enjoy the paper-fan look with zero setup stress ➜
19. Fringe Backdrop
Fringes are such a cool-looking and easy-to-make DIY backdrop idea! So if you want some cute and fancy background for your unique photo booths, you should check this out! You can choose what better fits your needs - cloth, paper, fabric, or ribbon.Once you choose, simply proceed with cutting your material into little stripes. Attach them all together, making a unique color combination according to your taste! Here’s your personalized fringe backdrop ready to be posed with.

Image from Pexels
20. DIY Macrame Backdrop
Now, if you really want to go all the way into creativity, don’t miss out on this! Try macrame! Macrame is a way of knotting a certain textile in such a way that creates beautiful art. It can be used to create bags, jewelry, clothing, and yes… backdrops too!
So if you feel inspired to try this beautiful art, definitely go for it! Because we’ll assure the outcome will be truly worth it, aesthetically powerful, and long-lasting.Handknotting yards of cord for that boho vibe can eat an evening (or three).
Printed macramé texture = instant cozy artisan feel, zero knots.

🌿 Add warmth, texture, and soul to your setup in seconds ➜
21. DIY Wooden Crate Backdrop
If you don’t want to spend too much time learning a new art, or creating something too complicated… we understand. That’s why we have another idea for you! You can simply take some wooden crates and place them together according to your needs and event.
Personalize them with plants, fabric, and unique signs that represent your festivity. This simple homemade backdrop will add attraction, simplicity, and vibe to your event.
Stacking actual crates looks rustic…until you haul them, level them, and store them again. A lightweight printed crate wall nails the vibe without the weight.

📦 Love crate walls? Keep them lightweight and studio-friendly ➜
22. Cardboard Backdrop DIY
What if you’re looking for a last-minute DIY backdrop that is both budget-friendly and unique? Do you think we didn’t have an answer for you too? Of course, we do! So if this is the case, simply go in your basement and find all those cardboards that you thought you would never going to use.
Then break them into pieces and glue them flat on your preferred background. Add a plain-looking frame in front of it, that people at your event could be playing with! Here’s your last-minute, casual, and oh, so original photo booth backdrop ready!

Image from Pexels
23. Let’s go Down Memory Lane Wall
Here’s one for the cheesy friends who want a backdrop DIY that is meaningful and beautiful. Well, if this is the case… go down memory lane! Don’t be afraid of printing all those cute, nostalgic, memorable pictures that represent you and your friends.
Be even more extra with the addition of notes, cards, drawings, and anything that can feel truly meaningful. Have it all printed, or hanging from a wall or wooden crate. I’m sure it’s going to be the most popular and crowded part of the event.

Image from Pexels
24. Book Wall DIY
If you really don’t want to play small at your event, check this out! Here’s something that will truly stand out leaving everyone speechless. This is perfect especially for weddings, or artistic events. Have a book-theme photo booth.
Whether you want to take books and hang them, or select your favorite book’s pages, cut them, and glue them on a wall… it’s up to you! What matters is that you create a magical, literal wall that everyone will feel absolutely attracted to.
Book towers topple, eat table space, and block light unless you rig supports and level everything. Print a tidy bookcase scene with blooming flowers that never shifts.

🌸 Romantic, artistic, and beautifully balanced ➜
DIY Birthday Backdrop Ideas
What if you require something more specific? Maybe some creative backdrop for a birthday party?
Because if that’s the case, we’ve got what you need! Here are some perfect tips for your unique DIY birthday backdrop, customized to your own needs and desires… because it will be made by you!
Check these ideas out.
25. DIY Plate Photo Backdrop
Birthday plates are always needed during birthday parties! But hey, you don’t only have to use them to serve the cake on top of them. You can use them to DIY your perfect backdrop too. A way you can do so is by coloring them with your favorite, birthday-themed colors and gluing them on a wall, cardboard, or cloth. It will effortlessly add color, personality, and a touch of style to any birthday party.

Image from Pexels
26. DIY Floral Birthday Number Backdrops
Now, what shouts more birthday party than a birthday number? I mean, that’s the most important part of a birthday after all, don’t you think? So consider buying some flowers, or making some yourself with crepe paper and gluing them all together in the shape of the birthday boy/girl’s turning age.

Image from Istock
27. DIY Pom Pom Backdrop
Pom poms never get old! Whether you’re a cheerleader or not, they are that kind of accessory that always expresses celebration! So, consider adding some pom poms to your unique birthday party setting! You can do so by buying little colorful pom poms (or easily making some yourself with wool and needles) and attaching them with a string.
Have many hanging out from one string and have many strings prepared so that the effect will feel brimming and aesthetic. You’ll see how many people will want to pose in front and with this unique and fun DIY backdrop.

28. Origami Backdrop
Whether you’re into origami, or not, you should definitely check this out. Origami is such a beautiful art that is not only nice to see, but to do too. So if you want to get extra creative and learn a new art, you should get into it! There are so many different origamis you can consider making. From little birds to boats, flowers, and figures… you name it!
So once you learn how to make them, you can totally be creative and make origami to your own needs, vibe, and birthday party. Making it extra unique and filled with art that everyone at the party will love to admire.

Image from Shutterstock
29. Gift Wrapping Paper
What’s a birthday party without birthday gifts? To be in the birthday mood consider creating a DIY backdrop made of gift wrapping paper. You can choose if you’d like it to be simply with paper or filled with fake birthday gifts (you can simply wrap empty boxes) that you can glue on a cardboard wall.
Choose aesthetically-looking wrapping gift box backdrop that will enhance the overall birthday party vibe.

✨ A celebration-ready backdrop that never shifts or collapses ➜
30. Ribbon Flower Backdrop
You can buy ribbons to wrap your birthday presents, of course. But did you know that you can also buy ribbons to create your personalized DIY backdrop? You can easily do so by stitching the ribbons together in a way that resembles a flower.
Do as much as you can so to glue them all over a background either to fill a wall or to create a frame! Ribbon and ballons are always a perfect birthday decoration for your festive photo.

🌈 A ribbon wall that never tangles, twists, or droops ➜
31. The Good Old Classic Balloon Backdrop
How can we miss balloons? We’re talking about birthday parties, after all. So of course, if you love the good old classic outcome, get your breath ready to fill up tons of balloons! You can DIY a classy, cute backdrop filled with balloons in many ways. An idea is to buy all kinds of colored balloons and create a rainbow cloud setting.
Alternatively, you could create a balloon arch. Or, of course, you can fill your selected background with balloons, making a balloon wall. Whatever you pick is going to be a safe and cheap way to enhance any birthday party’s photos!

🎈 A balloon backdrop that stays flawless all day long ➜
32. Personalized Birthday Backdrop
If classic is not for you, then let’s get personal! Here’s an easy, budget-friendly way to DIY a birthday backdrop. Get your preferred type of backdrop paper out there. Make sure it’s one you can write or paint on. Then, get crazy creative with it! Be unique and deep.
Pain the birthday boy/girl’s name, the age, some nice elements, and drawings. Anything that will make it personalized and unique. Something that everyone would want to check out and pose with.

📸 Designed once, photographed beautifully forever ➜
33. Polaroid Frame Backdrop
What if you’d want to create that kind of backdrop that everyone would want to pose with for their Instagram shot? Then go ahead and create a polaroid-looking frame (big enough to fit at least three/four people) and hang it in your favorite area.
Paint a “Happy Birthday” right under it and add flowers, candles, or any other element you love around it! This will smoothly add up to your party and most probably, make it viral on Instagram too! Indeed, an effective DIY backdrop.
Big prop frames are awkward to carry, ding easily, and hog closet space. Print a vintage frame border on fabric; hang, shoot, fold, done.

✨ All the aesthetic, none of the bulk ➜
34. The Disco DIY Backdrop
If your birthday party’s theme is the disco glitter kind, here’s your perfect DIY backdrop idea! Go all the way glitter with the addition of silver or golden streamers (or little shiny mirrors, if you can find any).
Attach them on a wall or cardboard. Then proceed with framing it with gold or silver balloons! Add the cherry on the cake with a neon “Happy Birthday” sign. Have a fancy armchair or stool placed in front, where people at the party could be sitting and have their birthday party shot taken!
Real mirror balls scatter pin‑lights everywhere-you need careful angles (think ~45°) and controlled beams to land the sparkle where you want it. Or cheat with a printed disco scene that glows evenly.
Easy Win: Kate Disco Party Mirror Ball Backdrop

35. The Party Anemone DIY Backdrop
Here’s an idea for some less glitter and more cuteness DIY backdrop effect. If you want your birthday backdrop to stand out and be appealing here’s a tip!
Buy some red card paper and cut out some large petals from it. Glue five red petals together and add some black wool pom poms in the middle. Attach these paper blossom flowers on a red, black, or white surface. Frame your backdrop with black balloons and be ready for the cutest, most creative birthday shot!
Moisture wilts crepe petals and can bleed color; outdoor shoots are especially risky. Lock in bold blooms on washable fabric that shrugs off weather.
Easy Win: Kate Bold Paper Blooms Backdrop

🌸 Big, graphic florals made to pop in photos ➜
So, what are you waiting for?
Equip yourself with your favorite colors, mood, and creativity to create your tailored backdrop.
Remember there is no limit to your creativity - don’t be afraid to play big!


Weekly Picks 15%OFF
Save 15%


Save 15%


Save 15%


Save 15%


