


 Christmas


✨ Build your dream setup!
×


Photo Frame Sizes Ultimate Guide

Photo frame sizes give you options for displaying your photos on a tabletop, shelf or wall. This guide to picture frame sizes will assist you in choosing the best size to print your photo and put it in the right photo frame size based on image quality, the type of photo it is - portrait, baby, wedding, single or group, pet, nature, or travel, for example.
On this page, you’ll learn about popular photo frame sizes, photo resolution and print size, and factors to consider when choosing the best photo frame size.
Most Popular Photo Frame Sizes and Best Uses
The most popular photo frame sizes range from 4x6 inches to 30x40 inches. Some of the most commonly used sizes within this range are 5x7 inches, 8x10 inches, and 16x20 inches.
Here are popular picture frame sizes and the types of photos they are commonly used for.
Small Picture Frames
4x6 inches and 5x7 inches: Small picture frames are best for portraits, baby and kids pictures, vacation photos, pet photos and small group pictures with a limited number of subjects. Other common uses are for wedding photos, graduation photos, and close-ups of your favorite subjects. 5x7 inch frames are often used for framed gifts. These are good sizes for placement on tabletops and shelves.
Medium Picture Frames
8x10 inches, 11x14 inches and 12x16 inches: Medium picture frames are ideal for group photos such as family portraits and wedding parties, graduation pictures, landscape and nature photos, baby pictures and pet portraits. These sizes are versatile and can be placed on a shelf or tabletop or hung on the wall.
Large Picture Frames
16x20 inches, 18x24 inches, 20x30 inches: Large picture frames are a good choice for professional portraits, group photos such as family portraits or wedding party photos, event photos and nature and landscape photos. These large picture frame sizes are typically hung on the wall.
Extra Large Picture Frames
24x36 inches and 30x40 inches: Very large photo frame sizes are ideal for large group photos, professionally done high-resolution portraits, nature and landscape photos and event photos with a large number of subjects. Most extra-large picture frames are hung on the wall.
|
Photo Frame Size |
Common Photos |
Placement |
|
4x6 inches |
Newborn and babies, kids, pets, portraits |
Tabletop, desk, shelf |
|
5x7 inches |
Newborn and babies, kids, pets, portraits, travel |
Tabletop, desk, shelf |
|
8x10 inches |
Families, small groups, nature, weddings, graduation |
Tabletop, shelf, wall |
|
11x14 inches |
Professional portraits, families, events, groups, nature |
Tabletop, shelf, wall |
|
12x16 inches |
Professional portraits, families, events, wedding parties, groups, nature, landscapes |
Shelf, wall |
|
16x20 inches |
Professional portraits, families, events, weddings, sports, groups, nature, landscapes |
Shelf, wall |
|
24x36 inches |
Large groups, landscapes, families, events, wedding parties, portraits |
Wall |
|
30x40 inches |
Large groups, wedding parties, events, landscapes, nature |
Wall |
Less Common Photo Frame Sizes and Their Uses
Less common picture frame sizes include square sizes like 10x10, 12x12, 16x16 and 24x24, oval and round frames of various sizes, and odd rectangular sizes like 10x20, 11x17, 12x36, 13x19, 20x24 and 30x40 photo frames.
Large horizontal rectangular photo frames are ideal for panoramic photos, landscapes or a collage of several photos. Round and oval photo frames are placed on a stand or hung on the wall. Other unusual photo frame shapes include heart-shaped frames, octagonal or hexagonal picture frames.
Standard Photo Print Sizes
Picture frame size refers to the inner dimensions of the frame. For example, an 8x10 frame is designed to hold a picture up to 8x10 inches. The outer dimensions of the frame are larger, of course, depending on the width of the actual frame material.
As a result, standard photo print sizes are the same as the most common frame sizes. The most popular are 4x6, 5x7, 8x10, 11x14, 12x16, 16x20, 24x36 and 30x40 inches.

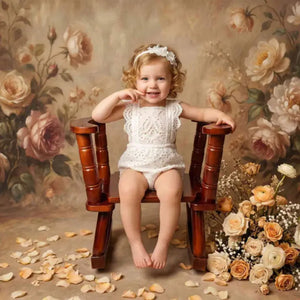
Image from Istock
Best Photo Resolution for Each Photo Frame Size
Photo resolution is important to consider when planning to print a picture. The larger the picture frame you intend to use, in other words, the larger the print, the higher the resolution of the image should be.
Resolution is defined in terms of pixels, or tiny dots of color that, altogether, make the image. The terms pixels per inch, or PPI or dots per inch, DPI, are used to express the image resolution. The higher the PPI or DPI, the greater the detail. Higher resolution results in sharper images and the opportunity for larger print sizes. Printing a low-resolution photo in a large size will lead to the print being grainy, lacking sharpness and detail.
High resolution is considered 300 PPI and higher. Medium resolution is 150-299 PPI. Anything less is considered low resolution.
Here are common frame sizes and print sizes with the minimum number of PPI and the recommended PPI for a crisp, detailed print.
|
Frame/Print Size |
Minimum Resolution |
Recommended Resolution |
|
4x6 inches |
480x720 |
1200x800 |
|
5x7 inches |
600x840 |
1500x2100 |
|
8x10 inches |
960x1200 |
2400x3000 |
|
11x14 inches |
1320x1680 |
3300x4200 |
|
12x16 inches |
1440x1920 |
3600x4800 |
|
16x20 inches |
1920x2400 |
4800x6000 |
|
24x36 inches |
2880x4320 |
7200x10800 |
|
30x40 inches |
3600x4800 |
9000x12000 |
Choosing the Right Frame Size for Your Photos
Consider these factors when choosing the best frame size for your photos.
- Photo resolution and print size: As noted above, pictures taken with high resolution can be printed larger while retaining excellent quality. Most photo printing services also recommend high-resolution printing of 300 PPI and higher. However, for casual photos displayed around your home, print quality of 150-299 PPI might be sufficient for your needs.
- Framing full bleed or with a border: Full bleed framing means that the picture fills the entire frame, and there is space such as matting around the photo. You might prefer to use a frame that is larger than the printed photo with a border or matting around it. Consider how you want the photo to be displayed when choosing a photo frame size.
- Subjects in the photo: A portrait of a single subject can go in any size frame, though 4x6 to 11x14 are the most common. As the number of people or subjects in the photo increases, you’ll want to print the photo larger, requiring a larger frame. 8x10 is a very common picture frame size for group photos. Also, nature photos like landscapes, beaches and mountains look better in larger photo frames.
- Display: Are you going to display the photo by itself? If so, choose a frame of at least 5x7 for tabletops and shelves and 8x10 for wall display – larger frames are a good choice. When you’re going to display the photo in a collection, such as a group of wedding photos or travel photos, then choose large prints and frames for the very best photos and smaller prints and frames for pictures that complement your best shots.
- Display location: Photos displayed on a desk, tabletop or shelf look great printed at 4x6 to 8x10. When the pictures are displayed on the wall, then 8x10 is about the smallest print and frame you want to choose.
- Cropping the image: If you only want to use part of an image, then consider what part you want to crop out of it and how large to have it printed so that once you cut it, the remaining part of the photo is the size you want.
Frame Sizes When Matting is Used
Matting around your photo gives it a customized appearance and sets of the image. It also offers protection to the photo, margin around it that prevents potential damage.
Mats are typically one to three inches. Wider matting is sometimes used for very large photo prints. The larger the print, the wider the mat border can be without overwhelming the photo. Wide matting sets off the picture and adds a dramatic visual touch. Sometimes double matting is used for special photos, with each border being one to three inches.
To choose a frame size when matting will be used, consider first the size of the print. Then add the width and height of the mat border to choose the right frame size. For example, an 8x10 picture with a one-inch border around all sides adds two inches of height and width, so the minimum frame size would need to be 10x12.
Keep in mind that picture frame sizes are limited, so you might have to go up in photo frame size to accommodate matting. For example, a 1-inch border around a 5x7 image would require a 7x9 frame, which is not a common size. You might have to choose an 8x10 frame and increase the border size.
|
Frame/Print Size |
Frame Size with Matting |
|
4x6 inches |
6x8 |
|
5x7 inches |
8x10 |
|
8x10 inches |
10x12 |
|
11x14 inches |
12x16 |
|
12x16 inches |
15x20 |
|
16x20 inches |
18x24 |
|
24x36 inches |
28x40 |
|
30x40 inches |
32x44 |


Weekly Picks 15%OFF
Save 15%


Save 15%


Save 15%


Save 15%