


 Christmas


✨ Build your dream setup!
×


Tutorials on How to Make a White Background in Lightroom | Photoshop

When you want to take a regular photograph and want to make it look a bit more professional, you use a white background. The magic behind this is quite obvious; a white background blocks out non important elements thereby giving the ability to concentrate on the main element of that pic.
So, if you are a photographer who is seeking a very quick answer on how to use Lightroom or Photoshop to achieve a white background, then you are in the right place.
Keep reading!
Make A White Background in Lightroom
This can be done using a few steps within the lightroom program, so let’s look at how can a white background be added to your photo. Here’s a detailed guide to doing this:
Step 1: Import Your Photo
If you have lightroom installed in your computer or smart device, start the application and upload the desired picture. To do so, please navigate the Library tab and click the “Import” button.

Step 2: Click on Develop Tab
After all the necessary adjustments and import it is time to enter the edit mode so to do so click on the “Develop” tab.

Step 3: Set the Exposure Level
Once in the develop tab, you should be able to locate the “Exposure” slider, simply move the slider towards the right, it will make the entire image bright white as exposure increases. Adjusting the “Contrast” slider will make the subject slightly visible, so do adjust it according to your picture.

Step 4: Use the Adjustment Brush
In the final step, move on to the toolbar and select the ‘Adjustment Brush’ option and set the exposure high so that you may use it to paint the background of your image white.

Step 5: Adjusting the Brush Settings
Remember that for a little more smoother transition, you’ll need to set the “Feather” and “Flow” settings. Also, we advise you to reduce the brush size so that you can make finer detailed edges using the tip of the brush.

Step 6: Manipulate Highlights and Whites
Take the background a notch higher by moving the “highlights” and “whites” sliders. However take care not to over highlight the subject or you will spoil the image.

Step 7: Look For Consistency
To ensure that your edit looks good, all areas that are meant to be white have to look the same. In the event of any such variation, you can use the brush or exposure setting to rectify the image.

Step 8: Export Work
After you have verified that your image is perfectly white, you have completed your work. You are free to save or export the images and use them in any tool outside of the Lightroom application.

Make A White Background in Photoshop
Creating a white background in Photoshop is also a possibility for those who are more familiar with it than Lightroom. For those who would like to do so, here is how exactly to do it:
Step 1: Opening the Image in Photoshop
The first thing you would need to do is start up Photoshop and load the image of your preference. Opening the image is usually done by clicking on File, followed by the Open option.

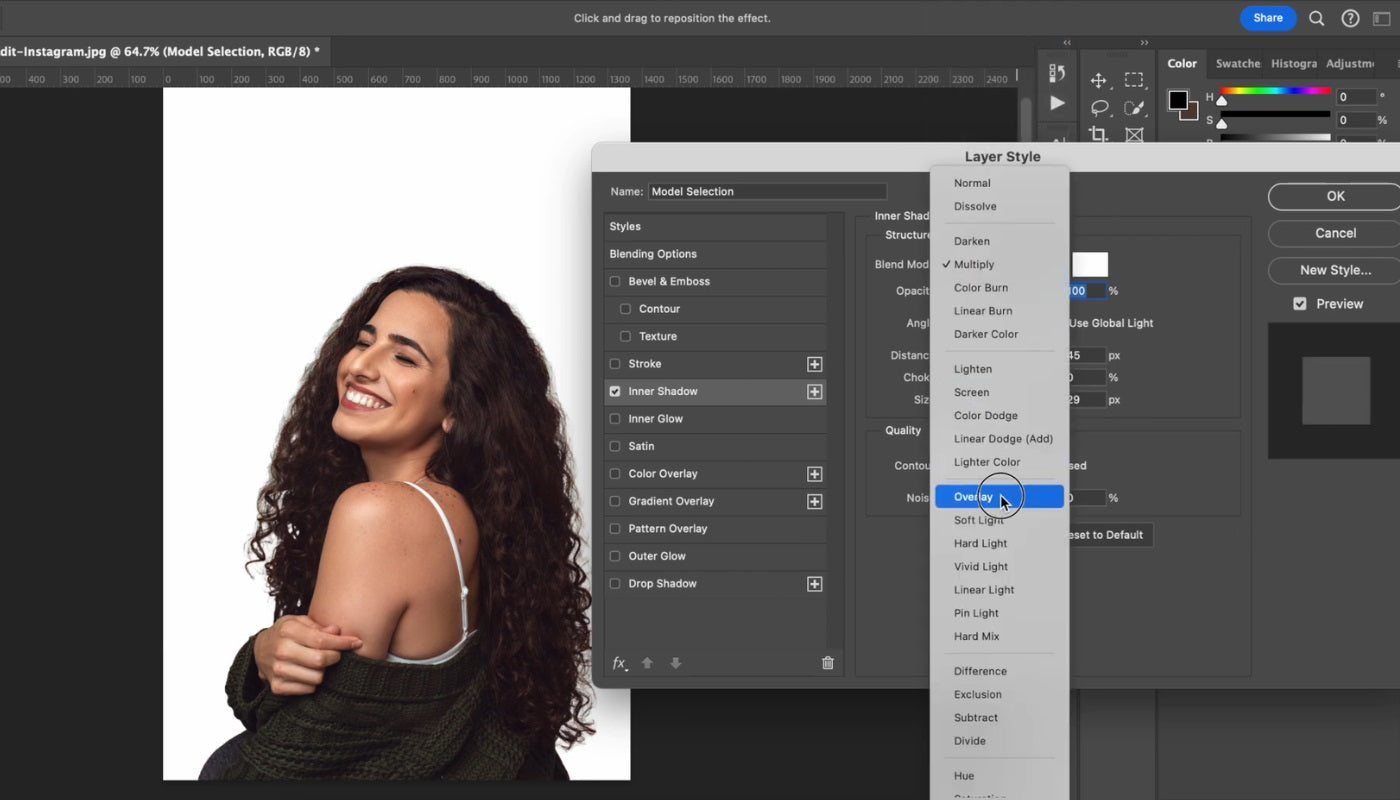
Step 2: Use the Quick Selection Tool to Outline the Subject
For the second step, it is time to identify the subject of the given image in Photoshop. This can be done by using the ‘Quick Selection Tool’, which is provided in the tool panel. This tool gives the user many brush sizes to choose from and allows them to outline a certain region of an image before editing it.

Step 3: Add a New Layer
Once the outline has been created for the given subject, select ‘Ctrl + J’ or ‘Cmd + J’ for Mac users. This command separates the subject from its background.

Step 4: Move a New Layer Behind the Subject Layer to Create a New Background
Having done that, modify the newly created layer by pressing the New Layer option located at the bottom of the Layers panel. After that, ensure to place the new layer under the subject layer.

Step 5: Fill the Background with White
Next, choose the new layer made and go to Edit > Fill. After this, find White under the Contents drop down box and click on Ok. What this does is it fills the whole background with opaque white color.

Step 6: Erase the rough edges
Check if the edges look rough. If so, select the edge and use the refine edge tools to make it look smooth. Under select, look for select and mask, but if you have an old version, then it is labeled to refine edge.

Step 7: Changes the Lighting and Shadows
To smooth away your subject, you don’t have to simply just use the refined edges tool. Instead you can simply change the Lighting and Shadows to ensure that it fits the background properly. Use either Levels or Curves layers to ensure that the background and the subject blend in perfectly.
Step 8: Save the Edited Image
Once you are content with your changes and modifications of the image as per your desire, click on File and then click on Save As option to save the new updated version of the edited image.

Choosing the Right White Backdrop for Different Photography Needs
Note that not all white backgrounds are the same since some could have a different shade and a different style, so which white do you use? We suggest using the following:
1. Kate Snow White Seamless Paper Backdrop for Photography
• Reason to Recommend: Seamless and texture free, smooth surface ideal for portrait and product photography.
• Best For: Commercial photography, product photography, portrait photography.

2. Kate Solid White Cloth Backdrop for Photography
• Reason to Recommend: Large size, durable, professional clean white background for various shoots.
• Best For: Fashion photography, portrait photography, product photography.

3. Solid White Vinyl Floor Backdrop
• Reason to Recommend: Durable, easy to clean, glossy surface, perfect for floor-level shooting.
• Best For: Product photography, still life photography, food photography.

4. Solid White & Black Collapsible Backdrop
• Reason to Recommend: Dual-sided, easy to fold and store, quick background change.
• Best For: Portrait photography, product photography, fashion photography.

Conclusion
All in all, you are able to take a plain looking business or product photo and with the help of white background make it look fantastic. This greatly reduces the distractions in the image and showcases finer details, giving more emphasis to the item.
For that reason, do consider following these guidelines while working towards a white background in lightroom and photoshop to create images that you will be happy to share with the world!


Weekly Picks 15%OFF
Save 15%


Save 15%


Save 15%


Save 15%